Wednesday, March 20, 2013

Program of the Week: Auto Body

Auto Body Refinishing 

We drive to school. We drive to work. We drive back home. We do it again the next day, everyday. Many of us take driving for granted that we don't realize how much sun exposure is damaging our car's paint job. Luckily, there's a way to refinish and fix the outer appearance of your car.


Students from the Auto Body Program at the Maricopa Skill Center demonstrate how to do a solid paint job in auto body refinishing. 
Auto Body garage at Maricopa Skill Center.
Preparation
Students remove and disassemble all parts to a car. After they are all taken down, students use soap and wax grease remover to clean all parts.

All parts and panels removed from a '03 Chevy Malibu.
Rust
Once all the parts are cleaned, a 40-Grit Sandpaper is used to strip down the paint. An 80-Grit Sandpaper is then used to take out all rusted areas. Once the rusted areas are smoothed out it is ready for masking application.

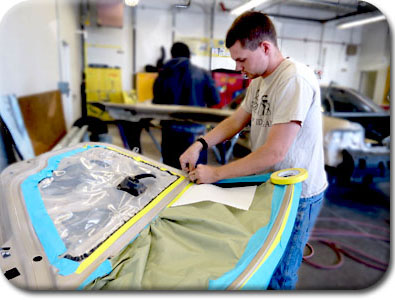
Clayton Cluff masks a door panel before applying primer.
Masking
Yellow tape is used for masking, which helps prevent paint from bleeding underneath. After all areas are carefully masked, the next step is to apply Etch primer.

Primer
Etch primer and primer is then applied to give the best protection to the metal. After the primer dries, wet sanding is done to help the paint adhere to the metal.

Paint
The next step is to reassemble all the parts and panels back together. The car is then driven to the paint booth where students spray base coat. After the base coat dries, three coats of the original paint are sprayed. After a few days of drying, three coats of clear are then sprayed.


Buff
After the clear coats dry, wet sanding is done again to sand out any other imperfections of the paint job. The car is then buffed and polished. 

Manuel Ortiz buffs the hood of a '93 Honda Prelude.
So there you have it! It may sound easy, but think again. This whole process takes a lot of time and skill to finish and MSC students got it under control. 

Stay tuned for next week's program spotlight: Health Care!

Wednesday, March 13, 2013

Program of the Week: Cosmetology

How To: Trim and Style Hair

Hair is known to be worth great value. Whether it's short, long, dark or light, hair is the biggest identity of a person. It is also the most purest form of protein in the world, which provides the brain vitamin D, energy, phosphorus, and metals.

From the Cosmetology Program at Maricopa Skill Center, student Shayquan Hollman aka Say Say, demonstrates a perfect method in maintaining a client's hair by trimming and styling it.
Shayquan Hollman (left) and Tonya Norwood after a complete hair trimming and styling.
 
Items Needed:
Shampoo and Conditioner
Olive Moisturizing Sheen Spray
Hair Dryer
Comb
Hair Clips
Flat Iron Protection
Thermal Styling Spray
Flat Iron
Hair Cutting Sheers
Hair and Scalp Conditioner 

1. Say Say first assists Tonya to the shampoo bowl to give her a good hair wash using shampoo and conditioner.


 2. After drying from the towel, Say Say sprays Olive Moisturizing Sheen Spray as a heat protectant before blow-drying Tonya's hair.


3. In order to dry her hair completely, Say Say parts each section with a hair clip. She then points the blow dryer down her hair with constant movements. 


4. After drying Tonya's hair, Say Say sprays a Flat Iron Protectant and a Thermal Styling Spray. Since Tonya's hair is coarse, it is crucial to straighten her hair with a hot iron so it can be combed into place with the ends lining up neatly when being cut.


5. Elaine Balderas, Cosmetology Instructor, guides Say Say in the most successful methods in hair-trimming.


6. Elaine presents the complete hair-trimming.


7. As a final touch, Say Say applies Hair and Scalp Conditioner before curling the ends of Tonya's hair to give her a voluminous look.


VoilĂ !


Stay tuned for next week's program spotlight: Auto Body!