Wednesday, April 17, 2013

Program of the Week: Meat Cutting

Apprentice Meat Cutter


Packaged retail meats in the Butcher Shop & Deli at Maricopa Skill Center.

Imagine wearing winter clothes all year-round in Arizona. In fact, none of us would survive especially in the middle of July! But, in the Meat Cutting Program at Maricopa Skill Center (MSC), students wear jackets and beanies to keep themselves warm. The average temperature inside the meat cutting room is set at approximately 30-40ºF to maintain proper sanitation.

Diagram of Beef Primal Cuts
MSC's Meat Cutting Program receives domestic orders from vendors, which arrive in large, divided sections called primal cuts (as shown in the diagram). The students process and handle these primal cuts into individual retail cuts.

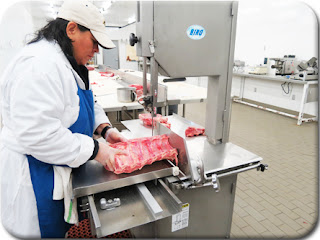
Students in the Meat Cutting Program demonstrate proper steps in preparing beef ribs and beef top sirloin for merchandising a retail meat case and for filling customer orders. 
_____________________________________________________________________

Beef Ribs


Step 1: A section of the beef rib area is carefully placed under a band saw to slice each piece.


Step 2: After each beef rib is sliced, the piece is examined to see if there is any bone dust, which is removed by a scraper.


Step 3: Any excess fat is trimmed using a 6-inch boning knife.


Step 4: A tray and clear wrap is used to package each beef rib.


Step 5: After the trays are sealed and labeled, they are merchandised in a retail meat case.
 _____________________________________________________________________

Beef Top Sirloin


Step 1: Each beef top sirloin is cut into any thickness the customer desires. The knife used to cut this is a 12-inch steak knife.


Step 2: This measuring tool was actually custom-made from the Precision Machining Program at GateWay Community College. It is used to accurately slice the thickness of the meat in different measurements.


Step 3: The beef top sirloin pieces are packaged in a freezer wrapping paper.


Step 4: The packages are then boxed up and ready for customers to pick up.


 _____________________________________________________________________


Butcher Shop & Deli at MSC.

As you can see, there are interesting steps that goes along processing and handling different types of meats. The next time you're shopping at the grocery store, you'll know exactly what's going on behind the counter in the meat cutting room.

Stay tuned for the next blog spotlight: Construction Trades!

Wednesday, April 3, 2013

Program of the Week: Health Care

Ophthalmic Assistant Training

Do you remember the moment where the sign across the street appeared blurry to you? Did you force yourself to squint so hard just so you can read what the words were saying? If so, you should probably make an appointment for an eye exam ASAP!

So, what can you expect in an eye exam?

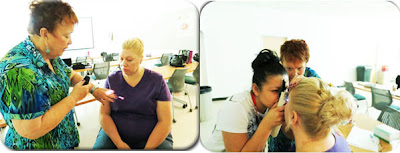
Students from the Ophthalmic Assistant Program at the Maricopa Skill Center demonstrate the process of a preliminary eye exam that is completed before meeting with an ophthalmologist.

Kerotometer in the Ophthalmic classroom at the Maricopa Skill Center.

Medical History
The patient is asked if there are any known medical histories that could include complaints, allergic reactions, medications, diabetes, injuries, and surgeries. 

Visual Acuity Test
This test is done to measure the sharpness of the patient's vision. He/she holds the occluder to cover one eye at a time while reading a Snellen chart or the near vision card. 

MSC students assist one another through a preliminary eye exam. 
Visual Field Test
The patient is tested to see if he/she is able to see if they have peripheral vision around their visual field. This tests for any early signs of glaucoma, which is an eye disease where the nerve in the back of the eye is damaged.

Extraocular Muscles

This test examines the patient's eye muscles, which is identified as extraocular muscles. This is done using two fingers to make an "H" pattern to check that all muscles are intact. 


Pupil Constriction
A pen light is directed towards the patient's eyes to check if it shrinks (constriction). The light is pointed directly at one eye at a time to see if the other eye reacts equally. When light is flashed at one eye, both pupils should constrict.
 
Instructor Pat Lamb (left) shows how a direct ophthalmoscope is used.

Other Eye Tests
There are other tests that are done while using different instruments to examine the inner eye. Instruments include a tonometer, a direct ophthalmoscope, or  a slit lamp that's mounted on an exam chair.

Tonometer
This is used to measure inocular pressure, which is the inside pressure of the eyes. If there is pressure it may indicate the beginning causes of glaucoma.


Direct Ophthalmoscope
This is a magnified tool that is used to examine the retina, which is a thin tissue layer of the back of the eye. It has a mirror where a blue light reflects into the eye.

Hand-held Slit Lamp
This lamp is also known as a biomicroscope. Before this test is done, orange drops with fluorescein are put into the white area of the eye to indicate any scratches in the surface of the eye. This examines the cornea, iris, pupil, lens, lashes, and lids.

Pat Lamb assists Ophthalmic students how to use a tonometer and a direct ophthalmoscope.

As you can see, getting an eye exam simply doesn't mean you're going in to get prescription eyeglasses or contact lens. Your eyes are being checked for eye disease and overall health!

Stay tuned for next week's program spotlight: Meat Cutting!